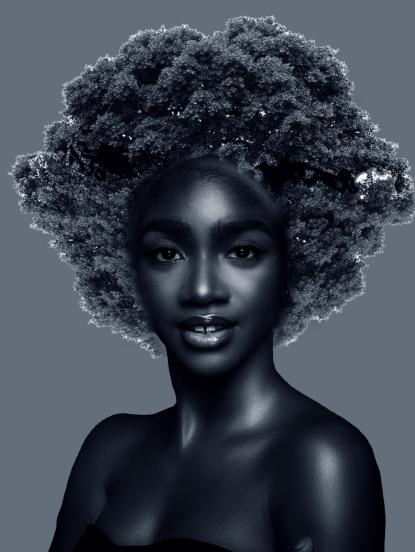
Mastering Double Exposure in Photoshop: A Creative Guide
Double exposure is a captivating photographic technique that combines two images into one, creating a surreal and artistic effect. In the digital age, Photoshop makes it easier than ever to achieve this mesmerizing look. Whether you're a seasoned graphic designer or a Photoshop newbie, mastering double exposure can add a powerful tool to your creative arsenal. Here?s what double exposure is and some tips to succeed in creating stunning double exposure images in Photoshop.
What is Double Exposure?
Double exposure, also known as multiple exposure, is a photographic effect that layers two different exposures onto a single image. Traditionally achieved using film cameras, this technique has been revolutionized by digital editing tools like Photoshop. The result is an ethereal and often thought-provoking image that blends elements of both photos, creating unique and compelling visuals.
Steps to Create Double Exposure in Photoshop:
- Select Your Images:
- Choose two high-quality images that complement each other. Typically, one image is a portrait, and the other is a landscape or an abstract texture.
- Open Photoshop and Import Images:
- Open Photoshop and load both images. Place each image on a separate layer, with the portrait usually being the top layer.
- Remove the Background:
- Use the Quick Selection Tool or the Pen Tool to select the subject of the portrait and remove the background. This helps in blending the portrait seamlessly with the second image.
- Adjust Layer Blending Modes:
- Set the blending mode of the portrait layer to ?Screen? or ?Lighten.? This allows the underlying image to blend through, creating the double exposure effect. Experiment with other blending modes like ?Overlay? or ?Multiply? to see different results.
- Refine the Composition:
- Use layer masks to fine-tune the blending. Add a layer mask to the portrait layer and use a soft brush to paint over areas you want to reveal or hide. This step allows for precise control over the final look.
- Adjust Levels and Colors:
- Use adjustment layers such as Levels, Curves, and Color Balance to harmonize the tones and colors of both images. This step ensures that the images blend seamlessly and appear cohesive.
Tips for Succeeding in Double Exposure:

??
- Choose Complementary Images:
- Ensure that the images you select complement each other in terms of theme, tone, and composition. For instance, combining a portrait with a nature scene often results in a harmonious and aesthetically pleasing double exposure.
- Experiment with Blending Modes:
- Don?t be afraid to experiment with different blending modes. Each mode interacts with the layers differently, offering a variety of artistic effects. ?Screen? and ?Lighten? are commonly used, but exploring others can lead to unique outcomes.
- Use High-Quality Images:
- High-resolution images yield better results. Blurry or low-quality images can detract from the overall impact of the double exposure effect.
- Refine with Layer Masks:
- Mastering layer masks is key to creating polished double exposure images. They allow for non-destructive editing, giving you the flexibility to make adjustments without permanently altering the original images.
- Play with Opacity:
- Adjust the opacity of the layers to control the intensity of the blend. Lowering the opacity can create a more subtle effect, while higher opacity can make the double exposure more pronounced.
- Add Finishing Touches:
- Consider adding final touches such as vignettes, gradients, or light leaks to enhance the mood and cohesiveness of your double exposure image.
Conclusion
Double exposure in Photoshop is a powerful technique that can transform your creative projects. By understanding the basics and applying these tips, you can create stunning and evocative images that captivate your audience. Embrace experimentation and let your creativity flow as you explore the endless possibilities of double exposure photography in Photoshop.