
Mastering Frequency Separation in Photoshop: A Comprehensive Guide
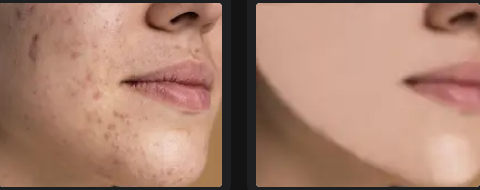
Frequency Separation is a powerful technique in Photoshop used primarily for high-end skin retouching. This method allows you to separate the texture and color information in an image, enabling you to edit them independently. This results in smooth, natural-looking skin while preserving intricate details and textures. Whether you're a professional retoucher or an enthusiast, mastering frequency separation can significantly enhance your photo editing skills.
What is Frequency Separation?
Frequency Separation divides an image into two layers:
- Low Frequency (Color/Tone): This layer contains the color and tonal information of the image.
- High Frequency (Texture/Detail): This layer retains the fine details and textures.
By separating these two elements, you can work on smoothing skin tones and removing blemishes without affecting the skin texture.
Steps to Perform Frequency Separation in Photoshop:
- Prepare Your Layers:
- Open your image in Photoshop and duplicate the background layer twice. Name the first duplicate ?Low Frequency? and the second duplicate ?High Frequency.?
- Blur the Low Frequency Layer:
- Select the ?Low Frequency? layer. Go to Filter > Blur > Gaussian Blur. Apply a blur that smooths out the fine details but retains the overall color and tone. The radius will vary depending on the resolution of your image, but it?s usually between 5-10 pixels.
- Create the High Frequency Layer:
- Select the ?High Frequency? layer. Go to Image > Apply Image. In the dialog box, set the following:
- Layer: Choose ?Low Frequency.?
- Blending: Subtract.
- Scale: 2.
- Offset: 128.
- Change the blending mode of the ?High Frequency? layer to Linear Light. This will bring back the image?s texture while keeping the layers separate.
- Retouching:
- Work on the ?Low Frequency? layer using tools like the Healing Brush, Clone Stamp, or Brush Tool to smooth out skin tones and even out color.
- Use the ?High Frequency? layer for fine detail work, such as removing blemishes or imperfections, using the Clone Stamp or Healing Brush Tool.
Tips for Effective Frequency Separation:
- Use a Tablet:
- A graphics tablet gives you more control and precision, making it easier to apply subtle edits, especially when working on delicate textures.
- Be Subtle:
- Avoid over-smoothing the skin. The goal is to enhance the natural look, not to create a plastic-like appearance. Keep adjustments minimal for a more realistic result.
- Check Your Work at 100% Zoom:
- Always zoom in to 100% to check the details and ensure that your edits look natural up close. This helps in catching any areas that might look off or unnatural.
- Layer Masks:
- Use layer masks to apply the frequency separation effect selectively. This is particularly useful for retouching specific areas without affecting the entire image.
- Adjust Blur Radius Appropriately:
- The Gaussian Blur radius should be set according to the resolution and detail of the image. For higher resolution images, a higher radius may be needed.
- Practice Patience:
- Frequency separation is a meticulous process. Take your time to make precise adjustments. Rushing through it can lead to unnatural results.
Conclusion
Frequency Separation is an essential technique in the toolkit of any serious photo retoucher. By separating color and texture, you can achieve professional-quality skin retouching while preserving the natural look of your subject. Remember to use this technique with a light touch, aiming for subtle enhancements rather than drastic changes. With practice and patience, you can master frequency separation and significantly elevate the quality of your photo editing work.